
How to Adjust the Tension on a Sewing Machine
Part 1
Understanding Your Machine

1. Find the thread guides.
The thread guides are the metal devices that help regulate tension. They are various loops that you run the thread through before looping it into your needle. They keep the thread from getting tangled and distribute the tension evenly from the spool to your fabric.
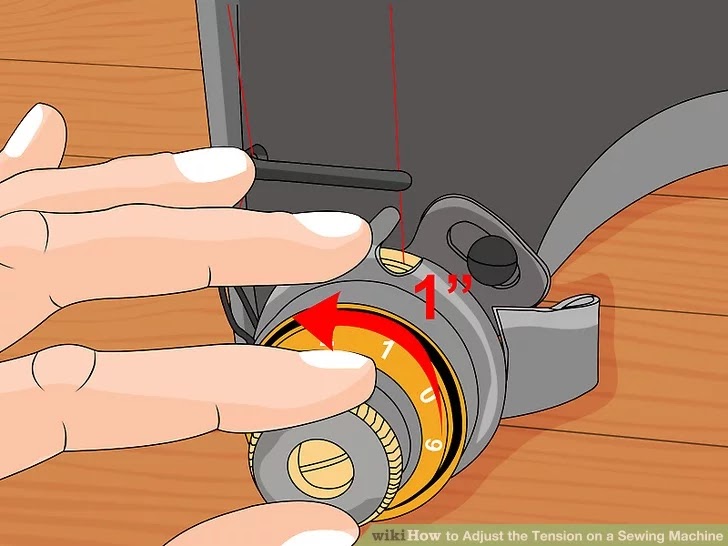
2. Find the tension discs and regulator.
The tension discs and tension regulator together are called the tension assembly. The tension discs squeeze the thread as it passes between them, while the tension regulator controls the amount of pressure on the discs. The tension regulator is elementary: when adjusted to a higher number (turned clockwise), the discs move closer together, increasing the pressure. Turned to a lower number (counterclockwise), the discs move apart, decreasing pressure.On older machines, there are only two tension discs, controlled by a screw or knob. On newer models, there are three discs controlled by a dial or keypad on the front of the machine.
Unless you have a newer machine that makes automatic upper-tension adjustments, using a thicker thread without resetting the dial will increase the pressure and cause the upper thread flow to decrease.

3. Find the bobbin.
The flat bobbin case spring exerts pressure on the thread as it comes out of the bobbin case. You can either have a loading drop in bobbin (you won’t have a bobbin case), or bottom loading with a bobbin case in a compartment below the needle. The amount of pressure on the bobbin is regulated by a small screw at the rear of the spring.Both the spring and screw are easy to locate when the machine has a separate bobbin case. When the machine has a drop-in bobbin with a built-in bobbin case, locating the tension screw can be more challenging but a little bit of searching will prove it’s there.
In either case, to increase the resistance, use a small screwdriver to turn the screw clockwise (to a higher number) or counterclockwise (to a lower number). Turn the screw in small increments and never more than a quarter-turn between tests.

4. Understand tension.
Tension is what keeps your bottom and top stitches in equal tension with one another. In other words, it is what keeps your front and back stitches looking the same. Both the top and bottom tension must work together in order to create consistent stitching. If your top and bottom stitches aren’t even, it may be due to your tension not being right on the top or bottom.Most domestic sewing machines are of the "lockstitch" variety. That means an upper thread and a lower thread "lock" together. When they don’t “lock” together properly, you could have an issue with the tension.
Part 2

Ensuring Tension is Your Problem
1. Sew a test seam.
Using a small swatch of fabric, run a couple of seams down the middle of the square. Observe the top and bottom surface of the seams, using a magnifying glass if need be.Remember you want your stitches to look even on both sides of your fabric. If the thread is so tight it’s causing the fabric to bunch around it or if the stitching is loose and falling apart, you might have an issue with the tension.
If your stitches look perfect and your sewing machine is sewing wonderfully, don’t touch your tension knobs!

2. Identify your problem.
You’ve sewn a test seam or two and you’ve inspected the seams. A perfect stitch will have threads locked midway between the two layers of cloth, with no loops on the top or bottom of the seam and no puckers in the cloth.An easy way to think of the thread balance is tug of war. You have your top thread and your bobbin thread pulling on each side. If they’re both pulling equally, the seam will be even and consistent. If one side is pulling too much, the thread from the other side will be visible.
If the bobbin thread shows on the top side of the seam and the top thread is straight, the upper tension is too tight. If top thread shows on the underside of the seam and the lower thread is straight, the upper tension is too loose.

3. Inspect your machine.
There are multiple problems that could be causing issues with your sewing machine that aren’t the tension. Make sure to check these possible causes before adjusting your tension knobs:- Incorrectly threaded machine: Is all of the thread running through the thread guides? Is thread unwinding freely from the spool or is it catching? Is the bobbin inserted correctly?
- Dirty machine: Thread ends can get lodged between tension discs, around the bobbin case, and under the throat pale. This can cause an increase in resistance and restrict the thread flow. Check all of these areas to ensure they’re clear.
- Damaged machine parts: Bent needles and bobbins and rough or damaged surfaces on the needle eyes, thread guides, tension discs, take-up lever, throat plate, presser foot, bobbin case, or in the bobbin area can all cause problems. Give your machine a general inspection and remember that even the tiniest damage can distort tension.

4.Pay attention to your needles, threads, and fabrics.
Different thread sizes on the top and in the bobbin can throw off your basic tension settings. A needle that is too large or too small can also unbalance your stitches. If you’re getting puckers on a lightweight fabric, trying shortening the stitch length to 1.75mm. All of these small details can wreak havoc on your project so make sure you’re detail-oriented when setting up your machine for a project.Polyester thread is a true all-purpose thread, and it’s a good choice for most sewing projects. Wool thread, on the other hand, is very thick and if you were to use it, you'd have to adjust your tension.
Common heavy duty fabrics include canvas and burlap while cotton and polyester are common fabrics with a standard weight. If you’re switching between heavy fabrics and something of a lighter weight, you’d have to adjust your tension to keep the stitches even.
Needles come in various sizes for different purposes. There are thicker needles designed for denim that won’t break when they’re being used and thin needles that won’t damage thin, delicate fabrics. When buying needles, you can consult someone in the store to help you find the best option for your fabric.
Part 3
Adjusting the Tension

1. Find your tension regulating dial.
It will be in a different place on every machine so if you’re not sure which knob it is, you can check your sewing machine manual. If you don’t have a manual, it is the knob with numbers on it that doesn’t change your type or stitches or length.
2. Adjust your top tension if it’s too loose.
To increase your top tension if it’s too loose, turn your knob so that the numbers are increasing. Try ½ to 1 number lower, then test the stitches on a piece of scrap fabric. Continue until it looks even on both sides and you can no longer see the bottom thread on the top.If you are unable to get it completely even, proceed to adjust the bobbin tension.
3. Adjust your top tension if it’s too tight.
To decrease your top tension if it is too tight, turn your knob so the numbers are decreasing. Try ½ to 1 number lower, then test the stitches on a piece of scrap fabric. Continue until it looks even on both sides and you can no longer see the bottom thread on the top.If you are unable to get it completely even, proceed to adjust the bobbin tension.

4. Adjust your bobbin tension.
You should always try to adjust your top tension first because you shouldn’t need to adjust your bobbin tension unless you are using a heavier or lighter thread than usual. If you’ve done that and still need to adjust the lower thread, locate your bobbin in either the top loading drop in bobbin (you won’t have a bobbin case) or bottom loading with a bobbin case.With a bottom loading bobbin, an easy way to test the tension is to take the thread hanging from your bobbin case in your hand. If it doesn’t unwind at all, your tension is too tight and needs to be loosened. If the thread unwinds with no effort, your tension is too loose and you’ll need to tighten it. You want to hold the thread and have it drop just a few inches. When that happens, your tension is perfect.
Use a tiny screwdriver and turn the screw on the side of the bobbin case by ¼ turn. Turn it right to increase the tension and left to decrease it. Test the tension again. Repeat until the thread only drops a few inches.
Similarly, with a top loading bobbin, you use a screwdriver and turn the screw by ¼ turn, testing your tension between each adjustment with a test seam on scrap fabric. The good old righty tighty lefty loosey applies in this situation as well.

5. Test your tension until it’s right.
Keep sewing test patches until your tension is right and you’ve got even stitches on both sides. Once you’re happy with the tension, finish setting yourself up, and start your project!Tips:
- As you begin sewing a seam, remember to pull the thread tails to the back of the machine and away from the needle area or "bird nesting" can occur. This is another common and frustrating occurrence for new machine operators.
- When you’re testing the tension with a seam, choose different colour threads for the top and bobbin thread. Make sure the thread contrasts with your fabric. This will make everything much easier to see and will make your adjustments more accurate. Just remember to change to the right colour thread before you’re ready to sew.
- It’s a good idea to start a tension log for your sewing machine. Just keep a notepad with the numbers written down for which tensions work with certain fabrics, threads, and needles. Note the brand, type, and size. This will make the adjusting process much simpler in the future.
- Always remember to try your top tension first. In 90% of tension issues, it’s just the top tension that needs to be adjusted.
courtesy: WikiHow
Follow us on:
Facebook: https://www.facebook.com/mysewingmall/
Instagram: https://www.instagram.com/mysewingmall/
Twitter: https://twitter.com/MySewingMall
Website: https://www.mysewingmall.com
Comments
Post a Comment